Launch A Canvas App In Model App From SiteMap
Canvas PowerApps provide a great amount of functionality with little or no code. Many examples demonstrate how to open a Canvas App within a Model App on a specific record and pass the context of that record.
What if you don’t want to open a Canvas App for a specific record? Let’s say you want to create a menu functionality for user to allow them to open other Canvas apps, or maybe you have developed a Canvas app which provides a file conversion function which doesn’t relate to records at all. It would be nice if we could easily load these types of Canvas Apps from the SiteMap. Here is how to get this done.
This solution is based off the solution from Dynamict but I have made some improvement that allow you to utilize the same WebResource over and over again and also provides information from the originating Model App.
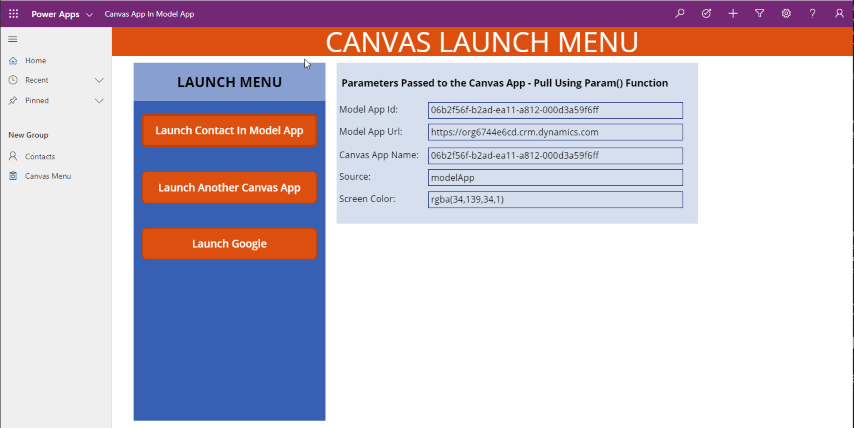
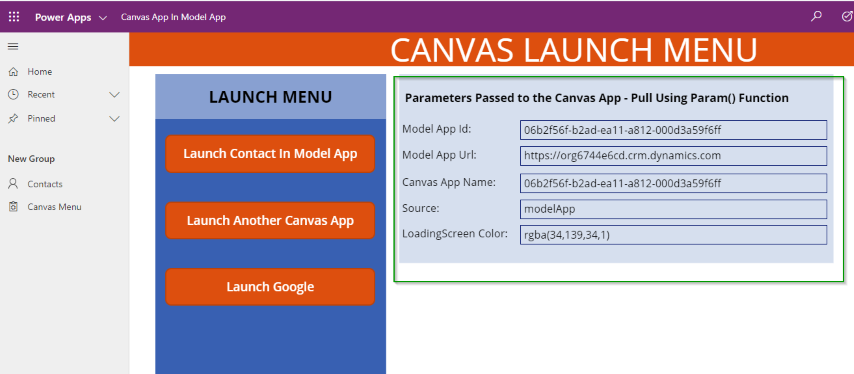
Here is an example of a Canvas app I have created which will display a menu of items which the user can launch. The Canvas App is being called from the SiteMap link in the Model app and displayed full screen within the content window.

Pre-Requisites
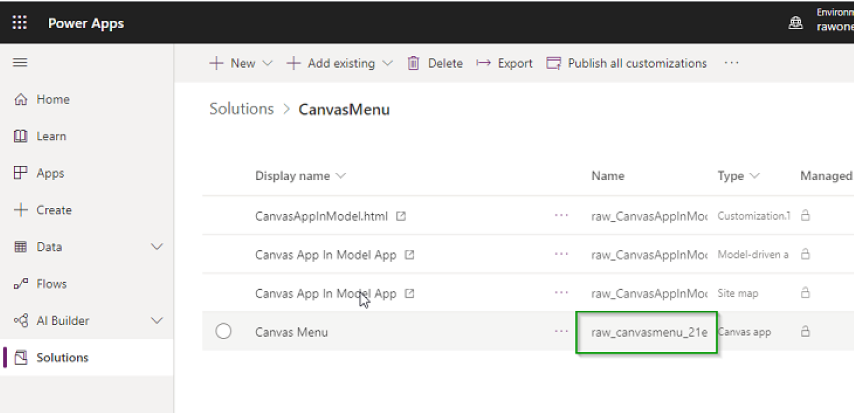
- The Canvas app you want to open must be in a Solution. If it is not then it will never show up in the “canvasapp” entity which we are using to get the App id. It does not matter what Solution it is in just that it sits in a solution within your environment.
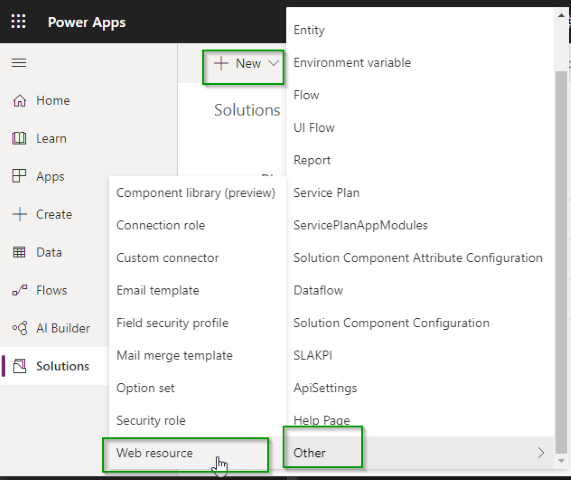
Create a New WebResource
Create a new HTML WebResource. You can download the source here or copy and past from below.
Add A SiteMap Link Using Data Parameter
The trick to not having to hard code the name of the Canvas App into the WebResource is the way in which we build the WebResource URL in the SiteMap. Typically when adding a WebResource we would choose the Type of the sub-area to be “Web Resource”, unfortunately doing this will now allow us to pass any additional URL parameters other than the ones provided by Microsoft into the WebResource. Our goal is to add a Data parameter that contains our Canvas App name and any other parameters we wish to pass to our WebResource so that it can do all the work of opening the Canvas App. So instead of using the “Web Resource” type on the SiteMap we will utilize the URL type and add the URL in the following format.
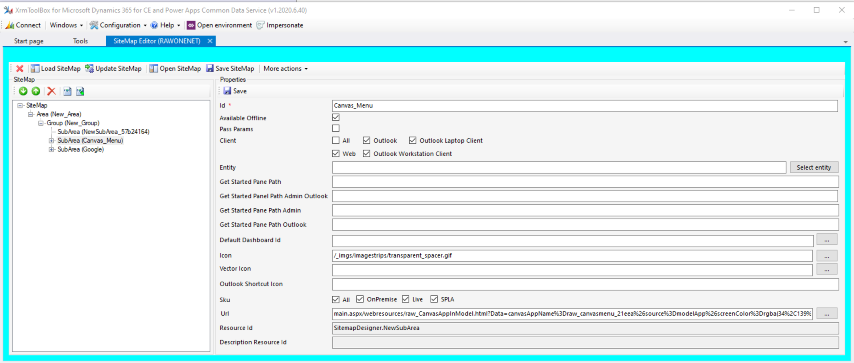
Note: This method will require that you utilize XRMToolbox or another XML program to manage your sitemap. If you are not comfortable with this then see the section called: Add A Simple SiteMap Link
main.aspx/webresources/<Web Resource Name We Created>?Data=<Our Parameters>
Example
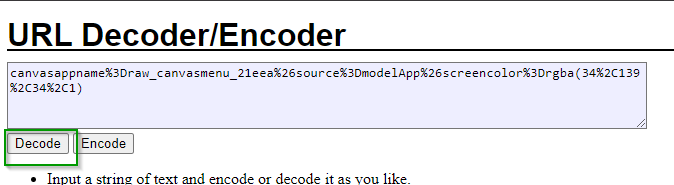
main.aspx/webresources/raw_CanvasAppInModel.html?Data=canvasappname%3Draw_canvasmenu_21eea%26source%3DmodelApp%26screencolor%3Drgba(34%2C139%2C34%2C1)
As you can see in the example the Data property appears to have several other parameters in it but they have all been encoded. If you want to see values decoded copy the contents of the data parameter use the decodeURIComponent command in a console window or use a website like this Decode/Encode.
Encoded Data Parameter
Decoded Data Parameter

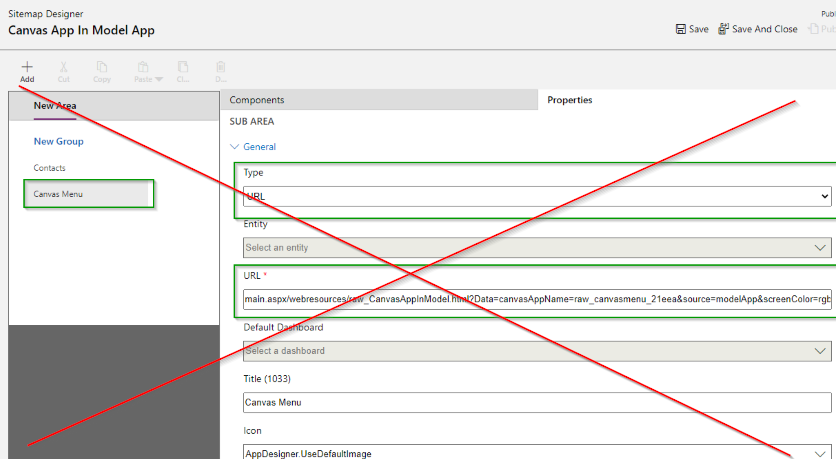
IMPORTANT NOTE - The SiteMap editor in the Maker portal will break your link to the WebResource if you use it to edit the sitemap. This happens when you click on your subarea because the editor will decode all of your data parameters. So make sure you edit your sitemap using XrmToolbox or an XML editor.
Looking at the parameters we can see that I have included three in this example. This list is just an example, as long as you include the canvasappname you can include however many other parameters you want!
- canvasappname - (Required) This is used by the WebResource to determine which Canvas App to open. To get the name of your App open the maker portal and look at the Name field for your App.
- newwindow - (Optional) This parameter will allow you to open the canvas app in a new window instead of embedding it in the Model App. Set this parameters to true or 1 if you want this app to open in another window.
- source - (Optional) Can be used within your Canvas app to determine which application or SiteMap link the app is being opened by. You could use this to determine which screen in your Canvas App should be opened when the link is clicked if you use a single Canvas App for multiple functions.
- screencolor - (Optional) Affects the loading screen color when the Canvas App is being accessed. This takes in an rgba value. For more information on this parameters check out the Microsoft article on Embedding Canvas Apps.
There are two additional parameters which the WebResource will automatically push to the Canvas app so there is no need to include them.
- modelappid - This will be the guid of your current Model app. This can be very useful in building links later back to records where you want the record screen to show up in the property App.
- modelappurl - Is a link back to the Model App url where you launched the Canvas App from. Again this can be useful later to build links.
Additionally if you select the Pass Parameters checkbox on the sitemap link you will be able to get three additional parameters in your canvas app: orgname, orglcid, userlcid.
After you have adjusted the Data parameters to be what you want make sure you go back and Encode them again before you past them into the SiteMap url.
Paste in your Url into the SubArea Url field in XRMToolbox. Make sure you leave the first half of your Url decoded. Then after the Data= paste in the additional parameters encoded.
1st Half of the URL
main.aspx/webresources/raw_CanvasAppInModel.html?Data=
2nd Half of the URL
canvasappname%3Draw_canvasmenu_21eea%26source%3DmodelApp%26screencolor%3Drgba(34%2C139%2C34%2C1)
Full Url
main.aspx/webresources/raw_CanvasAppInModel.html?Data=canvasappname%3Draw_canvasmenu_21eea%26source%3Dmodelapp%26screencolor%3Drgba(34%2C139%2C34%2C1)
Add A Simple SiteMap Link
If you want to utilize the PowerApps Maker portal for your sitemap you will need to create a web resource for each Canvas App link you would like to have on your sitemap. You can utilize the same code sample i have provided above and just comment out or remove the SET PARAMS USING DATA PARAMETER ON SITEMAP section code and un-comment the cod in the section called SET PARAMS USING INDIVIDUAL WEBRESOURCES
Follow the pattern of params.push(‘canvasappname=’ + ‘raw_yourappname’); in the code to set any parameters you want. The only required one is canvasappname. You do not need to add in the parameters for modelappid, modelappurl, orgname, orglcid, or userlcid as those wills till be added by the code.
//////////////////////////////////////////////////////////////////////////////////////////
// SET PARAMS USING DATA PARAMETER ON SITEMAP
// Additional params sent into a web resource should be URI encoded within the Data parameter.
// For additional information about the parameters you can pass to Canvas apps see the Microsoft
// documentation at https://docs.microsoft.com/en-us/powerapps/maker/canvas-apps/embed-apps-dev
//
// The only param you are required to have within the Data param is the appName param which will be the
// name of the Canvas application you want to load.
// let canvasAppName = getParameterByName('canvasappname');
// if (!canvasAppName)
// {
// Xrm.Navigation.openErrorDialog({
// message: 'The parameter canvasAppName was not provided in the Url. This parameter should contain the name of the Canvas App you are attempting to load.'
// });
// return;
// }
// params.push(getParameterByName('data'));

//////////////////////////////////////////////////////////////////////////////////////////

//////////////////////////////////////////////////////////////////////////////////////////
// SET PARAMS USING INDIVIDUAL WEBRESOURCES
// If managing your sitemap in XRMToolbox is not something you want to do you can comment/remove
// the SET PARAMS USING DATA PARAMETER ON SITEMAP section code and uncomment the code below
// and set your own parameters. Then hard code your values in and create a new copy of this
// WebResource per Canvas App you want to link to on the sitemap.
//

params.push('canvasappname=' + 'raw_yourappname');
params.push('source=' + 'yoursource');

//
//////////////////////////////////////////////////////////////////////////////////////////
After you have adjusted your code ad the file as a WebResource and create a SiteMap link using the PowerApps Maker portal just as you normally would. Remember that if you want to create a link to another Canvas App you will need to copy your WebResource and change the properties to point to your other Canvas App then create a new SiteMap link to that WebResource.
Adjusting the Canvas App To Fit Full Screen
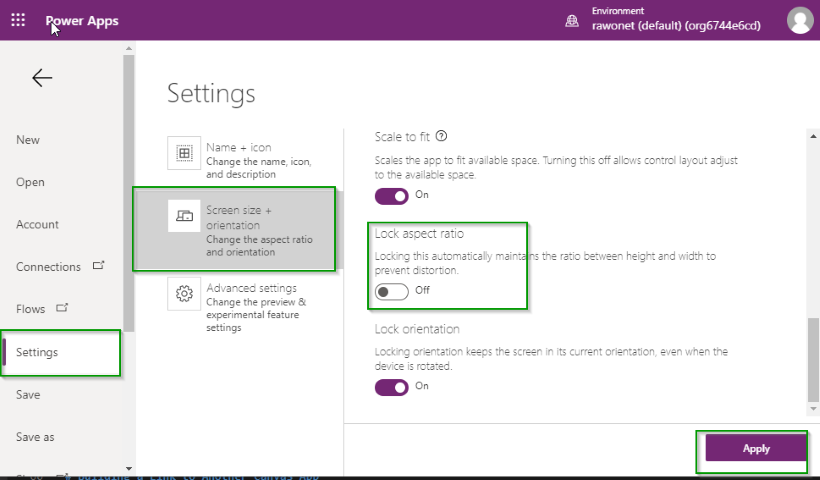
If you would like to make sure that your Canvas App fits completely within the content window without any space on the left or right it’s important to turn off the “Lock aspect ratio” setting with your app. This can be done within the Canvas Editor by going to Setting -> Screen size + orientation and un-setting the toggle for Lock aspect ratio. Make sure after you complete this you hit the Apply button in the lower right hand screen and Save/Publish the app.
Here is what the app looks like with the Lock aspect ratio turned off.
Here is what it looks ike with it turned on. You will notice that there is now grey padding around the app.

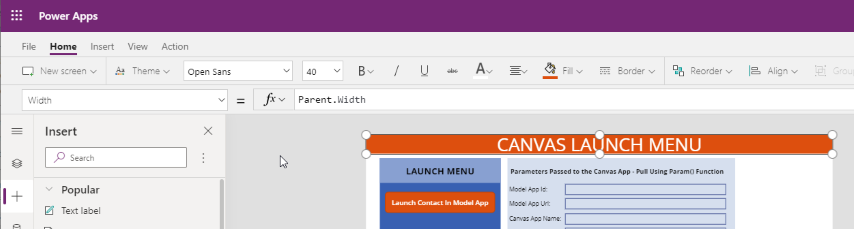
Additionally with the Lock aspect radio turned off we can now set elements within our app to span the entire screen. For example you can create a banner whose width is set to the Parent.Width of the app and that bar will be displayed across the entire app.
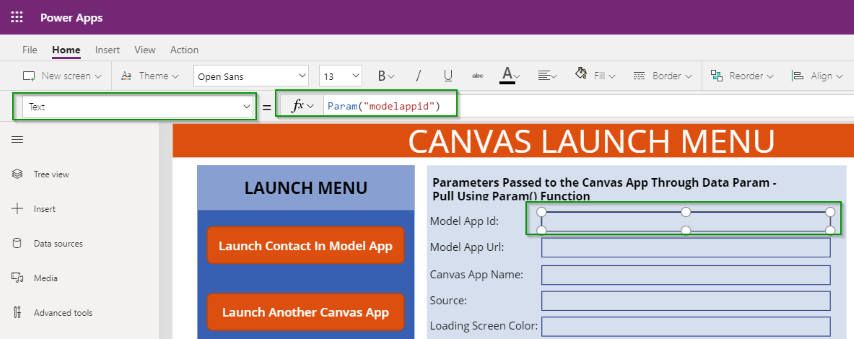
Getting the Parameters In Your Canvas App
Canvas App provide a function called Param which can be used to get the parameters from the Url that have been passed in. As you can see in the example below I am setting a label to the modelappid parameters which is automatically passed by the WebResource which opened the app.
Also make sure you note that parameter names are case sensitive.
Next we can utilize the parameters we have passed to accomplish things in our Canvas App such as opening other Canvas App or Links to Record in our Model App.
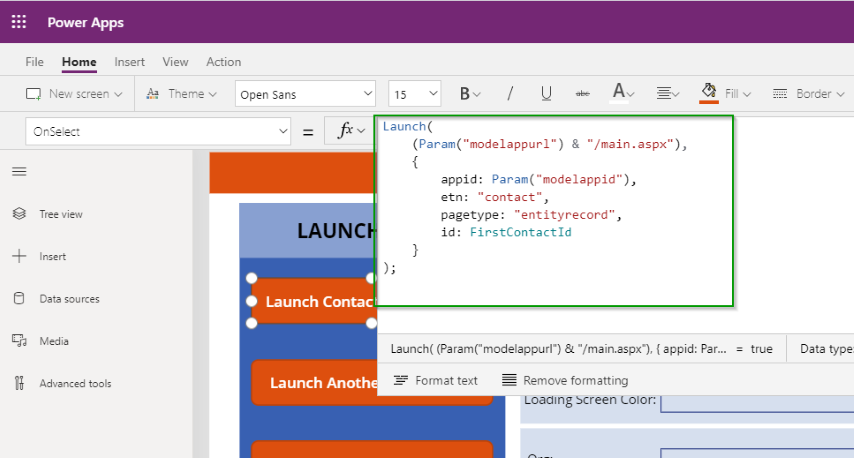
Building a Link Back to A Record In the Model App
Having the Model App Url and Id can be very helpful if we ever want to create links back to the Model App for records. Below I have used these parameters to build out a link which will open up the first contact in the system. This could be easily modified to open any other entity by modifying the values being used in the id and etc fields.
This utilizes the Launch function and builds our the Model App url using the parameter. As of now the Launch function will open this link in a new tab. Opening it in a new window or the current window is in preview and available on some environments.
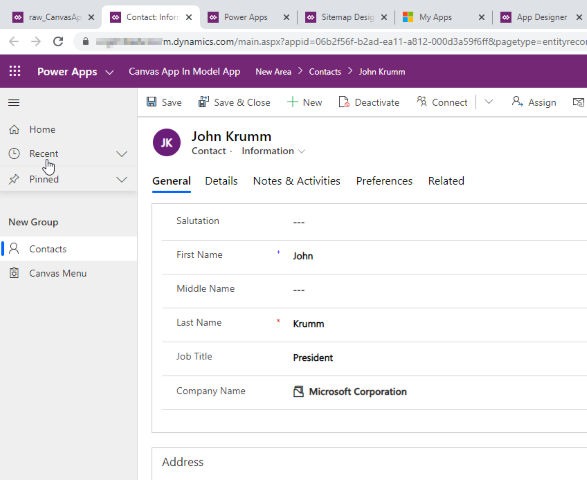
Now when we click on the button we will get a new tab with the Contacts entity record displayed.
Building a Link to Another Canvas App
In my example i am building a Menu function which will allow users to complete other actions. Some of those action may involve opening another Canvas App. We can do this utilize the Launch functionality we used to open an entity record above.
To start we need to get the App Id of the other Canvas App. We can do this by adding the Canvas App data source to our Canvas App and then filtering down on the Name field to get the app we want. You can get the name of the other app by opening the Make portal and looking at the Apps name field.
In this example I have created a variable in my App Start to get the Id of the App I wanted.
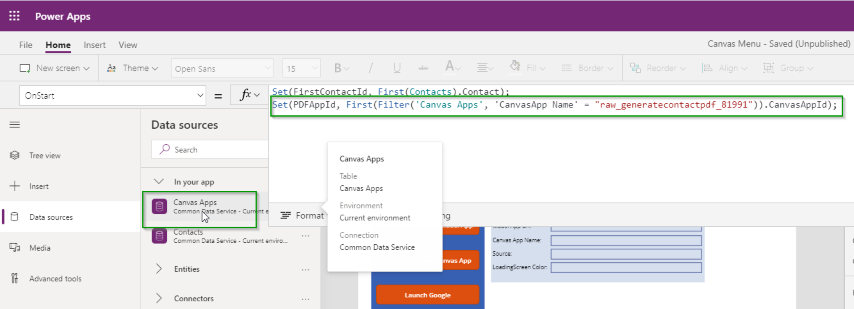
Then create a button to Launch the new app in another tab.
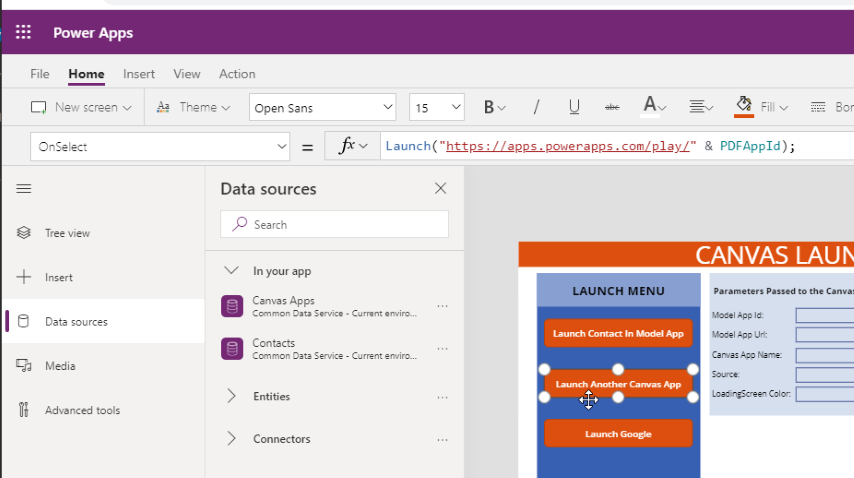
The other app will be opened.


Nice article, which you have shared here. Your article is very informative and I liked your way to express your views in this post. The article you have shared here is very informative and the points you have mentioned are very helpful. Thanks for sharing this article here. Best mobile application development company
ReplyDeleteSo nice I am enjoying for that post as for u latest version of this Security tool Available
ReplyDeleteopencanvas crack
nch photopad image editor pro crack
adobe dimension cc crack
sd maid pro crack
Since malware is increasingly rising for the Android app teaching feeling 3.0 apk platform day by day, you must pay firm attention to what is going on your phone or tablet. Smartphones are basically computers - and all PCs are at risk to viruses, phishing, including various attacks from malicious software when install diff apps .
ReplyDeleteEReaders are all the rage currently and there are literally dozens of different models currently on the market. How do you wade through all of the choices and pick one best suited for you? Select the asphalt xtreme hack download requirements you want based on a set of criteria laid out in this article.
ReplyDeleteThis app can boost our working output in a specialised way. Thanks!
ReplyDeletethis is the incredible data for us. Material PowerApps furnish a lot of usefulness with practically zero code. Numerous models show how to open a Canvas App inside a Model App on a particular record and pass the setting of that record. you can really take a look at data about Netshare pro apk: https://structuralknowledge.com/netshare-pro-apk/
ReplyDeleteThis is the incredible data for us. Material PowerApps furnish a lot of usefulness with practically zero code. Numerous models show how to open a Canvas App inside a Model App on a particular record and pass the setting of that record. you can really take a look at data about netshare-pro-apk
ReplyDeleteYou can also download Alight Motion Mod APK, one of the best video editing app.
ReplyDeleteUnlock powerful video editing features with the Alight Motion Mod APK Elevate your creativity with premium tools and effects for free. Download now for an enhanced editing experience!
ReplyDeleteI read all the information and I took a shot of it and edit on alight motion transition and then send to my fellow.
ReplyDeleteyou want learn how to add transitions in your videos in alight motion than click on the link https://alightmotionsapps.com/how-to-do-transitions-on-alight-motion/
ReplyDelete