Posts

Showing posts from 2019

Convert Markdown Documents to PDF Using md-to-pdf

Image
Convert Markdown Documents to PDF Using md-to-pdf Azure DevOps now has an option to link your Wiki to a repo . With this change I decided to start creating all my documentation in Markdown and then to supply my users with PDF output for things such as user guide. This allows me to source control my documents and still supply users with clean looking outputs. Here is how i went about doing this. Create Documents Folder/Package I started by creating a new folder for my documents and running the npm init command. Install md-to-pdf from NPM Install the md-to-pdf npm package by running npm i --save-dev md-to-pdf Create Index.js file Create a index.js file in the root directory of your folder and copy the following code. const mdToPdf = require('md-to-pdf'); const config = { "pdf_options": { "format": "Letter", "margin": "15mm", "displayHeaderFooter": true, "headerTemplate": "<style>s

PCF Color Picker

Image
For anyone looking for a PCF Color Picker I just released one out on GitHub! It utilizes React and the Office UI Fabric controls. GitHub Project Solution File Note - Image above shows the color field twice so that you see that the field is being updated.

Dynamics BPF Javascript: NEW onPreStageChange Handler!

If you are utilizing the UCI interface there is a new JavaScript handler available for the Business Process Flows (BPF), onPreStageChange .  Unlike the onStageChange handler on Pre StageChange fires before the actual business process has been changed so that you can evaluate if you want the change to occur and prevent it if needed. With this new handler we can now get rid of many of the Synchronous workflows used previously to evaluate the changes made to a BPF.  By removing these workflows the overall performance of your BPF changes should be increased.  Additionally calling JavaScript code being before the change also eliminates additional problems such as the users clicking the Next/Previous multiple times before the workflows have been fired ( Tip #360 )  To utilize the new handler you will needed to create a function and then pass that function into the addOnPreStageChange function provided under executionContext.getFormContext().data.process.  It is best practice to pass

Icon Resources for Dynamics

Below are resources that you can utilize within your Dynamics project for generating icons. Image Icons IcoMoon Font Imager FlatIcons Icons8 Microsoft Dynamics CRM Icon Pack Microsoft Dynamics 365 Icon Pack for 2017 Metro Studio  - Additional Info On How to Use from PowerObjects React Icons These are icon libraries that can be utilized within a React PCF control. Office UI Fabric

Rollup Field Refresh on UCI Form

Image
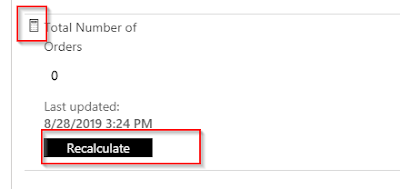
In the web client version of Dynamics when you hovered over a rollup field it would show a refresh icon to the right of the field.  In the Unified Client Interface (UCI) version of Dynamics to recalculate the field you can click on the Calculator icon to the left of the field name and a Recalculate button will appear.

Custom Flow Connector For Parsing Address

Image
While working on a demo of the Business Cards Scanner component for PowerApps I found that the component only returns the address as a single line and not as parsed address components ( UPDATE : The Business Card Scanner does not split the address fields into the same level of detail as the Contact/Account entities).  After looking around for flow connectors that could parse the data I only found one from Pitney Bowes.  Looking around there are a lot APIs available for address parsing but they are not currently available on Flow so I decided to build my first custom Flow connector to utilize one of these APIs. Address Labs ( http://www.addresslabs.com/ ) does not require an API key to use and since I'm only doing a few calls for my demos it worked well for me.  You can also check out their document on GitHub ( https://github.com/addresslabs/api-docs/blob/master/README.md ). One of the easiest ways to create a custom connector to flow is to use a Postman collection. After d

Update Business Process Flow Using Flow

Image
When working through App In A Day Workshop I wanted to improve the Approval flow to move the Business Process Flow (BPF) Stage forward if the Device Order was Approved.  I have utilized plugins and workflow previously to accomplish this type of action but never with Flow.  After doing a quick search i found an article from Elaiza Benitez ( Automatically update the stage of a Business Process Flow with Flow 2.0 ), make sure to check it out it's great.  My post here utilizes the techniques Elaiza provided but applies it to the Device Approval Request Flow as part of the App In A Day workshop. Below if the final Device Approval Request.  The parts I added to the BPF are outlined in Red. The first thing we need to do is get the Device Procurement Process record for the Device Order that applies to the BPF we build in the workshop. Next we need to parse the returned record using the Parse JSON action.  In order to get the schema for this action just run the Flow with the p

Get Dynamics/CDS Base URL in Flow To Generate Links To Record

Image
When sending emails or approvals in flow it can be helpful to also include a link to the record which is being referenced.  In order to send those links though we need the environment URL of the Dynamics/CDS environment.  This article shows an example of how to get the base URL for the environment and how to build a link based upon it.  This will be demonstrated within a Flow created for the App In A Day Workshop . In this Flow we are attempting to get an approval when a Device Order entity record is created from our Canvas App.  The Approval step allows us to include a link to the item and we will also be sending out emails to the requester based upon the Approval outcome which will include the link. The first Action we need to add to our existing workflow is the CDS Get record step.  Why do we need this step?  Well unfortunately the Output that is provided from the Flow Trigger of when a record is created does not include the URL to the record.  Instead we need also include the G

PowerApps Naming Conventions and Coding Standards

When building canvas apps the naming conventions used by the objects can be very confusing once you have added a few screens.  It is important to make sure you rename your components while working to allow for better readability and supportability of your application.  Below are some common naming conventions which are available within the  PowerApps canvas app coding standards and guidelines whitepaper . Control name    Abbreviation button  btn camera control   cam canvas   can card   crd  collection   col combo box   cmb dates   dte drop down   drp form   frm gallery   gal group   grp header page shape   hdr html text   htm icon   ico image   img label   lbl page section shape   sec shapes (rectangle, circle, and so on)   shp table data   tbl text input   txt timer   tim

Turn on Teams/Skype Meeting Recording and Transcription for Entire Organization

Image
<# .SYNOPSIS Turn on meeting recording and transcription for entire organization .PREREQUISITES Download the Skype for Business Online Connector Module - https://www.microsoft.com/en-us/download/details.aspx?id=39366 .ADDITIONAL RESOURCES Teams cloud meeting recording - https://docs.microsoft.com/en-us/microsoftteams/cloud-recording Manage Skype for Business Online with Office 365 PowerShell - https://docs.microsoft.com/en-us/office365/enterprise/powershell/manage-skype-for-business-online-with-office-365-powershell #> Import-Module SkypeOnlineConnector # Update this to a user who is a Teams Administrator $userName="admin@test.onmicrosoft.com" $message = "Please Login Using Your Office 365 Credentials" $credentials = Get-Credential -UserName $userName -Message $message $TeamsSession = New-CsOnlineSession -Credential $credentials Import-PSSession $TeamsSession # Turns on recording and transcription for everyone withing the organization Set-CsTeamsMe

Validate Solution Using the PowerApp Checker (Includes On-Premise Solution)

I recently saw the article on how to validate solutions using the PowerApps Solution Checker and wanted to share the link.  The Checker will work for all on-line and on-premise solution starting with Dynamics 2011.  When I have some more time I'll write up an article on how to use this in DevOps. Automatically validate your solutions using the PowerApps checker PowerShell Module PowerApps Checker - Powershell

Finding Largest Files on Drive Using Powershell

Recently a colleague of mine was having issues with low drive space on one of our servers.  Because this is a clients system i am unable to copy over WinDirStat which is what i would usually use to determine what is eating up all the drive space.  Instead I ended up using PowerShell to show me to top files which were eating up space. dir -path c:\ -rec -ErrorAction SilentlyContinue | sort -desc Length | select -first 20

Generating Test Files of A Specific Size

While attempting to unit test the max upload size of files to CRM I needed to generates files of different sizes.  Since Windows XP came out Microsoft has included a utility called fsutil that you can run at the command line to do just this thing. fsutil file createnew filename filesizeinbytes 1. Open a Command Prompt (As Administrator) 2. Run the following command fsutil file createnew "c:\temp\test5.txt" 5242880 If you need to convert from Megabytes to Bytes you can use this quick converter:  Megabytes to Bytes Converter

Cannot Access SharePoint Files Without Visitor Access in Dynamics CRM Documents Grid

Recently while building a system which synchronized Dynamics permissions to SharePoint we came upon an error which caused the SharePoint Document grid to tell us that we did not have the correct permissions to access the files.  Our code was creating SharePoint document libraries with their inheritance broken, and then synchronizing the security.  When we viewed the document libraries in SharePoint it appears the users had all the permissions they needed but upon opening the Documents grid in Dynamics CRM we would receive an error.  What we found was that the users needed to have at least read access to the root SharePoint site.  After adding the users into the site Visitors group the grid starting showing users the files they had access to.

SharePoint Documents Grid Error in Dynamics CRM

After setting up Server based authentication between SharePoint and Dynamics on several instances we were having issues on certain instances where users would attempt to access the Document grid within CRM and would receive the following error "You don't have permissions to view files in this location. Contact your Microsoft OneDrive owner or SharePoint administrator for access."  The grid ribbon buttons still loaded and if we clicked on the Open Location button SharePoint would open with all the files displaying which told us that the user had the required permissions. After troubleshooting with a Microsoft tech for a few hours we concluded that the fix was populating the SharePoint Email Address field on the User record for each user within CRM.  Another important thing to note here is that we were using Azure AD account which had an account name of rick@ad.test.com but the email address was rick@test.com (no ad in the domain name).  I had previously found the article

Dynamics Multi Entity Search (Global Search) Entity Selection Using C#

Image
While coming up with deployment scripts i was tasked to ensure that the Dynamics Global Search had specific entities selected.  By utilizing one the undocumented SDK message i was able to set this data. ( list of undocumented messages ) The manual way of updating these settings 1. Navigate to Settings -> Administration -> System Settings 2. Click on the button for Select entities for categories search 3. Add/Remove the entities you want utilizing the selection screen. How to do it utilizing code: var request = new OrganizationRequest("SaveEntityGroupConfiguration"); //create a new QuickFindCofigurationCollection var qfCollection = new QuickFindConfigurationCollection(); //add the entities you want to include in Global Search qfCollection.Add(new QuickFindConfiguration("contact")); qfCollection.Add(new QuickFindConfiguration("incident")); //set the parameters for the request. It took several hours and digging through the //CRM Sdk

Filter Customer Id field on Case Entity To Only Show Contacts or Accounts

Recently while working on a project where the customer was utilizing the Case entity they wanted to only allow users to enter contacts into the Customer Id field. In order to achieve this you first need ensure that the pre-search only shows contacts.  Next we need to ensure that if the user clicks the "Look up more records" link they only see the option for Contacts in the Look For drop down. Note : In order to change this to only show Accounts just change all the references to "contact" or "contactid" to "account" and "accountid" respectively. //attach our filtering code to the customerid field Xrm.Page.getControl("customerid").addPreSearch(filterCustomerField); function filterCustomerField() { //This filter ensures that no accounts will be returned since the accountid field is never null var customerContactFilter = " "; Xrm.Page.getControl("customerid").addCustomFilter(customerContactFilter,

Exporting Duplicate Detection Rules Using CRM Configuration Migration (Data Migration Tool)

Image
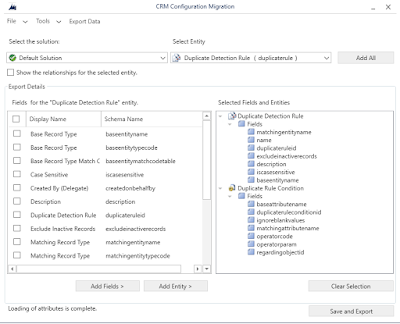
In order to move Duplicate Detection Rules to another system utilizing the CRM Configuration Migration tool make sure to add the Duplicate Detection Rule and Duplicate Rule Condition entities to the Schema. VERY IMPORTANT NOTE!: Before you try to export the records you have to Unpublish the rules otherwise the tool will skip exporting all the Duplicate Detection Rules and just export the Duplicate Rule Conditions causing you import to fail.

Modify Logon Setting in IE When Group Policy Doesn't Allow It

Image
Recently I needed to "Prompt for user name and password" when logging into my Local Intranet zone so that I could test as multiple users.  A colleague of mine made me aware of the registry settings for these option so you can modify.  These settings will be overwritten next time Group Policy is applied but they provide a good temporary workaround. Default Settings for Local Intranet Zone Locked Out The specific key for the Local Intranet Zone is located at HKEY_LOCAL_MACHINE\SOFTWARE\Policies\Microsoft\Windows\CurrentVersion\Internet Settings\Zones\1. The key name is 1A00 HKEY_LOCAL_MACHINE\SOFTWARE\Policies\Microsoft\Windows\CurrentVersion\Internet Settings\Zones\1\1A00 Just update this value to 20000 and your setting will now be switched to "Prompt for user name and password" Prompt for user name and password is not selected. Here is the listing of the other Zones: Value Setting ------------------------------ 0 My Compu

Navigate to the Document Associate Grid View From Record

This will allow you to navigate to the Documents Associated Grid view form a button in the main records ribbon.  This currently works for Dynamics 9.0 and 9.1 Online.  Some of the previous versions used navDocument instead of navSPDocuments. -Create a new ribbon button called DOCUMENTS -Create a WebResource with a javascript function, something like this function navigateToSharePointDocuments() { Xrm.Page.ui.navigation.items.get("navSPDocuments").setFocus();   }; -From the new button call the javascript function.